

§Building the first screen
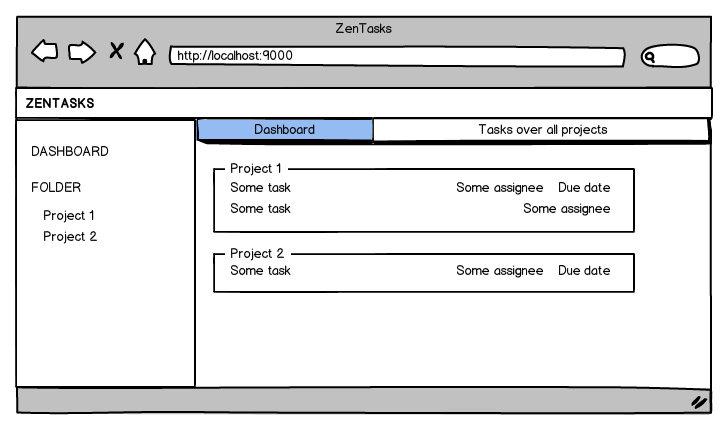
Now that we have built a first data model, it’s time to start to create the first page of the application. This page will be the dashboard, and it will show a summary of all projects and the todo tasks for those projects.
Here is a mock of what we want to achieve:
§Bootstrapping with default data
In fact before coding the first screen we need one more thing. Working on a web application without test data is not fun. You can’t even test what you’re doing. But because we haven’t developed the screens for managing tasks yet, we can’t populate the task dashboard with tasks ourselves.
One way to inject default data into the blog is to load a YAML file at application load time, the same way we did for testing. To do that we will hook into Plays startup to bootstrap the application with data. Hooking into Plays startup is as simple as creating a class called Global that implements GlobalSettings in the root package, and overriding the onApplicationStart() method. Let’s do that now, by creating the app/Global.java file:
import play.*;
import play.libs.*;
import com.avaje.ebean.Ebean;
import models.*;
import java.util.*;

public class Global extends GlobalSettings {
    @Override
    public void onStart(Application app) {
        // Check if the database is empty
        if (User.find.findRowCount() == 0) {
            Ebean.save((List) Yaml.load("initial-data.yml"));
        }
    }
}
Now this will be called whenever play starts up.
In fact this job will be run differently in dev or prod modes. In dev mode, play waits for a first request to start. So this job will be executed synchronously at the first request. That way, if the job fails, you will get the error message in your browser. In prod mode however, the job will be executed at application start (synchronously with the
startcommand) and will prevent the application from starting in case of an error.
You have to create an initial-data.yml in the conf directory. You can of course reuse the test-data.yml content that we just used for tests previously.
Now run the application using play run and display the http://localhost:9000 page in the browser.
§The dashboard
This time, we can really start to code the dashboard.
Do you remember how the first page is displayed? First the routes file defines that the / URL will invoke the controllers.Application.index() action method. Then this method calls render() and executes the app/views/Application/index.scala.html template.
We will keep these components but add code to them to load the tasks list and display them.
Open the app/controllers/Application.java file, and modify the index() action to load the projects and tasks, like so:
package controllers;
import play.*;
import play.mvc.*;
import play.data.*;
import static play.data.Form.*;
import models.*;
import views.html.*;
public class Application extends Controller {
public static Result index() {
return ok(index.render(
Project.find.all(),
Task.find.all()
));
}
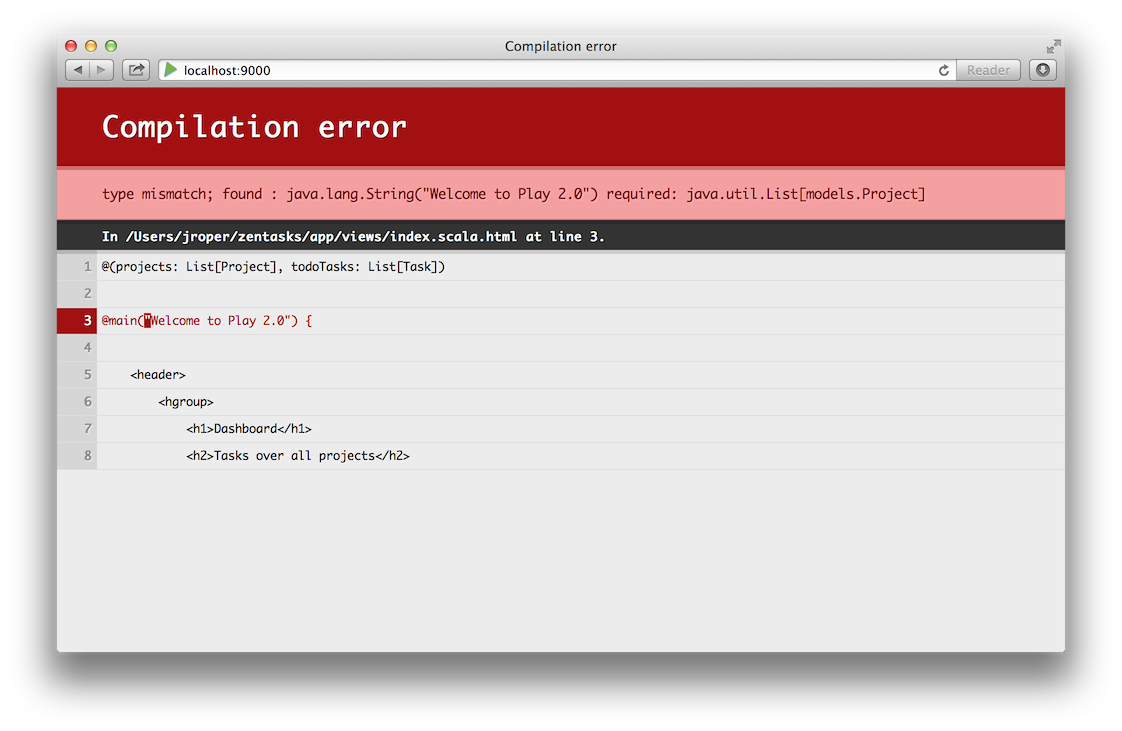
}Can you see how we pass objects to the render method? If you try and run this now, you’ll find you get a compiler error, because if you remember, our index template only accepted one parameter, that being a String, but now we are passing a list of Project and a list of Task.
Open the app/views/index.scala.html template and modify it to accept and display these objects:
@(projects: List[Project], todoTasks: List[Task])

@main("Welcome to Play 2.0") {

    <header>
        <hgroup>
            <h1>Dashboard</h1>
            <h2>Tasks over all projects</h2>
        </hgroup>
    </header>

    <article  class="tasks">
        @todoTasks.groupBy(_.project).map {
            case (project, tasks) => {
                <div class="folder" data-folder-id="@project.id">
                    <header>
                        <h3>@project.name</h3>
                    </header>
                    <ul class="list">
                        @tasks.map { task =>
                            <li data-task-id="@task.id">
                                <h4>@task.title</h4>
                                @if(task.dueDate != null) {
                                    <time datetime="@task.dueDate">
                                        @task.dueDate.format("MMM dd yyyy")</time>
                                }

                                @if(task.assignedTo != null && task.assignedTo.email != null) {
                                    <span class="assignedTo">@task.assignedTo.email</span>
                                }
                            </li>
                        }
                    </ul>
                </div>
            }
        }
    </article>

}
You can read more about the template language here. Basically, it allows you to access your java objects in a type safe manner. Under the hood we use Scala. Most of the pretty constructs you see (like map, case and =>) come from Scala. But you don’t really need to learn Scala to write play templates, just a small amount will allow you to do almost anything.
Ok, now refresh the dashboard.

Not pretty but it works!
As we write more pages, we are probably going to run into cases where we need to render tasks again, and all that code to render a single task is going to end up being duplicated. Let’s use the template composition concept we learnt earlier to pull this logic into something like a function that we can call from many places.
To create a function, just create a new template file with the name of the function as the template name. In our case we’re also going to namespace it into the tasks folder, so open app/views/tasks/item.scala.html. We start by declaring the parameters, just like we’ve done for other templates:
@(task: Task)

<li data-task-id="@task.id">
    <h4>@task.title</h4>
    @if(task.dueDate != null) {
        <time datetime="@task.dueDate">
            @task.dueDate.format("MMM dd yyyy")</time>
    }

    @if(task.assignedTo != null && task.assignedTo.email != null) {
        <span class="assignedTo">@task.assignedTo.email</span>
    }
</li>
And now we can replace that piece of code in our index template with a call to our new template:
    <ul class="list">
        @tasks.map { task =>
            @views.html.tasks.item(task)
        }
    </ul>
Reload the page and check that all is fine.
§Improving the layout
As we discussed before, index.scala.html is using main.scala.html to wrap its content. Because we want to provide a common layout for all pages, with the right title, links, and a sidebar containing a list of projects, we need to modify this file.
Also, if you were looking carefully, you’ll notice that in our index.scala.html template we never used the projects list that was loaded and passed in. This is where we are going to render it.
Edit the app/views/main.scala.html file:
@(projects: List[Project])(body: Html)

<html>
    <head>
        <title>Zentasks</title>
        <link rel="stylesheet" type="text/css" media="screen" href="@routes.Assets.at("stylesheets/main.css")">
        <script type="text/javascript" src="@routes.Assets.at("javascripts/jquery-1.7.1.js")"></script>
    </head>
    <body>
        <header>
            <a href="@routes.Application.index" id="logo"><span>Zen</span>tasks</a>
        </header>
        <nav>
            <h4 class="dashboard"><a href="#/">Dashboard</a></h4>
            <ul id="projects">
                @projects.groupBy(_.folder).map {
                    case (group, projects) => {
                        @views.html.projects.group(group, projects)
                    }
                }
            </ul>
        </nav>
        <section id="main">
            @body
        </section>
    </body>
</html>
Like with the rendering of each Task in our index page, we have made the rendering of a group of projects its own template, for later reuse. Let’s implement that template now, open app/views/html/projects/group.scala.html:
@(group: String, projects: List[Project])

<li data-group="@group">
    <span class="toggle"></span>
    <h4 class="groupName">@group</h4>
    <span class="loader">Loading</span>
    <dl class="options">
        <dt>Options</dt>
        <dd>
            <button class="newProject">New project</button>
            <button class="deleteGroup">Remove group</button>
        </dd>
    </dl>
    <ul>
        @projects.map { project =>
            @views.html.projects.item(project)
        }
    </ul>
</li>
And again, the individual project items are implemented using their own template, app/views/html/projects/item.scala.html:
@(project: Project)

<li data-project="@project.id">
    <a class="name" href="#">@project.name</a>
    <button class="delete" href="#">Delete</button>
    <span class="loader">Loading</span>
</li>
These templates may be simple now, but they will allow us to reuse them early on, and as we make them more complex, every place that uses them will gain that functionality.
Refresh the page.
Uh oh! We have a compile error. We haven’t updated the call to the main template from our index template to pass a list of projects instead of a string. Let’s fix that now, by editing app/views/html/index.scala.html:
@(projects: List[Project], todoTasks: List[Task])

@main(projects) {
    ...
And now refresh the page to make sure it all works. We should see the list of projects, divided into folders, at the top of the screen before the dashboard heading.
§Adding some style
Now the first version of the dashboard is almost done, but it’s not very pretty. We’ll add some style to make it shinier. As you have seen, the main template file mail.scala.html includes the public/stylesheets/main.css. The first thing to do is delete this stylesheet, because we are not going to use it. Rather, we are going to implement our stylesheets using LESS.
There is nothing stopping you from using plain CSS for your stylesheets, but Play framework comes in built with LESS support, which allows you to define stylesheets in a more dynamic fashion, using varaibles, mixins, functions etc.
Explaining CSS and LESS is beyond the scope of this tutorial, so for now we’ll just get you to download the stylesheets that we’ve already written. These stylesheets should contain all the styles needed to build the rest of the site. You can download a tarball of these files here, which you can extract from the root folder of your project, this will place a number of *.less files in the app/assets/stylesheets directory.
LESS stylesheets need to be compiled to CSS before they can be used. Just like Play automatically compiles the routes, Java code and templates, when Play sees LESS files on your classpath, it will automatically compile them, and recompile them each time you change them. And again, it displays errors beautifully in your browser if a compile error is encountered.
Since there is a app/assets/stylesheets/main.less file, Play will automatically compile this to replace our old public/assets/stylesheets/main.css file, so there is no need to make any changes to our templates (make sure you deleted the old main.css file though).
Our stylesheets also depend on some images. You can download a tarball of these here, which you can also extract from the root folder of your project. This will create a public folder with all the images and Javascript dependencies required by the project.
Refresh the home page and you should now see a styled page.
§Commit your work
The first iteration of the tasks dashboard is now finished. As usual we can commit this version to git:
$ git status
$ git add .
$ git commit -m "Dashboard"
Go to the next part.